Showing posts with label blogger tricks. Show all posts

Top 10 Best ways to Increase Blog Traffic/Blogging tricks


Being in the field of blogging i always search for tricks which could drive traffic to blog as much as possible in easy steps. Hence today I'm gonna share 10 simple steps that you can implement to increase traffic of your blog.
1. Make sure your posts are SEO Optimized which drives more traffic.
2. Write guest posts for other blogs which is similar to your blog(i mean to say if your blog is about tech then choose the same kind of blog for guest posting)
3. Use Article marketing to gain exposure.
4. Write about the content that you are good at and  make sure that what you write is fresh and updated one.
5. Make sure the content you post is not copied from other sites as it draws negative impression on the visitors.
6. Promote your post on social networking sites like twitter,Facebook and others.
7. Make your blog interactive by creating Facebook page or groups too discuss their question and forget to reply the comments made by visitors as soon as possible.
8. Market your blog through emails,YouTube,and others.
9. Insert inter links in the post of similar labels or content.
10.  Make sure that you use best keyword and title of the blog post as it cannot be changed in link once by default

2015:Trick to add twitter and pinterest follow me button on blogger in just 2 steps.


Friends,
Today I'm gonna share  that how you can add twitter and pinterest follow me icon on your blog to increase the followers and so do blog traffic. traffic is one of the thing that every blogger needs  and this social networking sites contributes around 25% in that hence here is few steps that you need to follow.

1. To add Twitter and pinterest follow me button click  on the below link

 For Twitter:

  •  Just sing in to your Twitter account and click on  Here .
  •  Now enter your twitter username and now the codes will be generated on the right side as show in the below  image.

  • Now copy those codes and go to your blogger layout and click on  add gadget then select Html /java script and paste those codes there and save. 
  • You can arrange the location where ever you want by dragging to desired position  but dont forget to save arrangements.
  • Your work is done .
To add pinterest follow button
  
  •  Click Here to add pinterest follow to blog.
  •  Now Enter your Pinterest url and write your name , finally lick on build it ! .
  •  The codes will be generated  , now copy those codes and follow the procedure as mentioned above in twitter.
You can add both the codes in same gadget but just some space after one another.


Or

You can also add both of them in just two steps.

1 Copy the below codes and replace the highlighted words with your user name in twitter codes,Replace url and username in  pinterest code.

Code for twitter.

<a href=http://twitter.com/Enter your user name class="twitter-follow-button">Follow
@Enter your user name</a>
<script src="http://platform.twitter.com/widgets.js" type="text/javascript"></script>

Code For Pinterest:

<a data-pin-do="buttonFollow" href="Replace with your pintrest url">enter your user name</a>
 
2. Go to blogger layout and click on add gadget and select HTML/ java script  and paste this codes and save. check out your home page to check out results.


Best Trick to Add facebook Fan page to Blogger/How to


Today's post is about a trick to add Facebook fan page to your blogger. Being a blogger  its very important to increase the traffic in as much as possible ways.. Facebook is of the most popular social medium used globally. Hence its one of the best way you can use to drive traffic to your blog and market your products.
 

Check out below that how you can add Facebook fan page on the blog in few simple steps.

1. Sign in your Facebook account and enter social plugins page or just  Click Here.

2.  Now enter your Facebook fan page link in it as show in image


3. After entering the name, you can uncheck the Show Steam and click on Get Code, a set of code will be pop up now select the option  IFRAME as show below.


 4. Now go to your blogger dashboard ,select layout and then click on Add Gadget  and select HTML/Java Script and paste  the codes you got from above step 3 and save them.

5. You can arrange where ever you want by dragging it to the desired position and  finally save the arrangement. You are done with it.

6. Now check out your blog for the result.

App To Manage Your Blogger Account on Androids[How To]


Hello friends,


 Blogging is made easy  now on android device and at one go you can post and manage your blog on your smartphones,mac and tablet running on android... Now enjoy blogging wherever you are through this app which is  launched recently and  almost all feature are same as you enjoy on your desktop and the interesting feature is that you can click the Fresh photo and upload on the blog..I'm just enjoying it , hope that even you'll like it

Some of the feature are mentioned below:  
    With the help of this app you can easily compose a post and you can save to draft or immediately publish 
    You can also Edit existing posts
    You can view list of your saved and published posts  and switch account/blog if you have more than one
    You can add an image from the gallery, or, by taking a picture directly from the app
    You can  add labels to your posts
    You can add location information

Top 5+ Android apps bloggers must have !!! Blogging Tricks


Friends,

Being a blogger i know its very difficult to manage time for posting blogs , have a eye on the statistics & on the floating topics .. So here sharing some of the tools or apps to manage your blog on go and update with latest trending topics.

Download from here  by clicking on the Name


*gAnalyticsapp: This app is used to keep eye on the main options as Panel, Visitors, Content, Goals and E commerce, you will feel so comfortable using it on an Android device.
*Blogger: Blogging on the go in just one click. blog wherever you are and when you you want
*Google Drive: We often use to store our file and access them from anywhere and share them with others
*WordPress: One of most important blogging field, enjoy writing ,reading post and publish at one go where you are.
*Dictionary.com: It is useful to find out the meaning of words which you dont understand while writing a content...
*Tape-a-Talk Voice Record: It is quit useful app which is high quality voice recorder designed for simplicity and is able to record voice notes/voice memos/audio even when the display is off.

Submit blog to 50+ Search Engines at one click 2013 -2014


Hello friends,

As a new blogger or in this field you need to increase the traffic for your blog and you can do this by submitting your blog to several  search engines like Google, bing ,yahoo and many other which drives traffic to your blog.

 Here sharing with you all a simple trick to share or submit your blog to many SE at single click. just follow few simple steps and you are done with it


1. Click Here , you'll be directed on other page.

2. Enter your blog address and email address on the given tabs.

3. Just Click submit  and you are done with it .


4. In case you need to submit more then one blog then after submitting  you can refresh the page.

Essential Methods To Market Your Blog


Without effective marketing strategies of a blog decent traffic can’t be achieved. Many popular websites pay lots of money for making their blog’s marketing strong. But these days you are completely enclosed by many blogs so for making your marketing strategies effective you have to pay attention to some important points so that you can stand in this crowd. In this post I am mentioning some important free as well as paid methods to get traffic to your blog. 


  • Social sharing: - As we know that for social media’s reputation is very important and also it is one of most cheapest and easiest method for social media marketing. If you are engaged in huge social media network and are having huge number of followers then it is beneficial to share content of your blog at very low rate. (Here cost does not refer to money). Here only hard work is to build a strong social network and do the good marketing of your blog. These days Pinterest, Facebook, Twitter and Google plus are most popular social marketing websites. They have millions of user active all day. So here a blog can be advertised free of cost. 
  • Social bookmarking: - We are having huge count of social bookmarking websites on internet. These websites have large number of active users. Rating of social bookmarking websites varies and there are some of them which can drive huge traffic to your blog. 
  • Groups/ Facebook page: - Using groups and Facebook page is a traditional method of blog promotion. If you are having fan page of your blog then blog post’s influence can be easily created. This fan page must have the name of your blog so that your social presence can be easily boosted up. On Facebook there are many active groups which can help in sharing of your blog’s link. With the help of this link sharing service you can easily drive huge traffic to your blog. Your social presence can remain maintained if you will remain active at your page.
  • Google Ad words: - You can achieve direct traffic with the help of Google Ad words but for doing this you have to spend few bucks on advertisement. Your bidding on PPC network will decide that your advertisement will appear in search result or not. So if your bid is lower than your add will appear in search results of the websites that are using Ad sense network.
  • Stumble upon Ads: - This is one of the most popular social bookmarking website which provides the site of your own interest. For accessing this facility you have to make a Stumble Upon account and then choose some category on it. It is based on browser’s technology with a button on its top corner. With the help of this button helps you to surf most wonderful website of your interest on Stumble Upon. Ad campaign facility is also available on this website at $0.05 per page. These ads are called Stumble upon ads. 
  • Sponsored Reviews: - Reviews from sponsors can be purchased for your blog and for making it better you have to spend some money. This will help in attracting huge amount of back links and traffic to your blog. Paid reviews can be enjoyed at as low $5 per review. 
  • Ad Banners: - Many famous websites provides offers the facility of direct adds banners. Instead of page views their rates are based on weekly and monthly basis. So banner advertisement of your site can be created and can be exposed by these websites.
  • Mailing list: - If you want to have huge count of readers for your blog then you must build a mailing list. If you are able to easily build and manage your blog’s mailing list then you can directly send fresh posts of your blog to your subscribers. With the help of mailing list you can easily market your brand. Useful tools for mailing list can be easily provided by many marketing services like Aweber and Mail Chimps. 
  • Write about shares and shits: - If you are unable to decide which topic to write then you can choose some random topic and can market then with links of some of your old blogs. A group of powerful people can be targeted for this purpose. You can also insert your experience and can share it with your subscribers. Sometimes you must write about some high ranking blogs or Epic topics. By doing this you will surely get some traffic. 

Trick to Remove Attribute from Blogger Template


Hello Friends,

Today I'm going to share a simple trick to remove Attribute from your blogger template , Just follow a simple step as show below

1.Go to design and select  template and choose Edit HTML.

2.Then find  the below code.

<b:widget id='Attribution1' locked='true' title='' type='Attribution'/>


 Now change the value of  locked ='false' and save the template.


3 Now go to  layout and select attribute and now you can see the remove tab now select that option.

that's it now it is completely removed from your blog


Snow Falling Effect Widgets for Blogger /WordPress


Hello friends,
In this post you can find Snow Falling Effect With Bells widget. You can use to add some charge to your blog over the Christmas. With just a small piece of code you have Snow Flakes gently falling down your blog. Adding Snow Falling Effect With Bells is very simple by just following few simple steps both for Blogger and WordPress

Adding To Blogger

  1. Go to Design > Page Elements.
  2. Click Add A Gadget.
  3. In Add A Gadget window, select HTML/Javascript .
  4. Copy the code below and paste it inside the content box.
  5. Save the gadget.
  6. Drag the gadget and reposition it under Blog Posts gadget.
  7. Click Save button (top right hand corner).

Adding To WordPress

  1. Go to Dashboard > Appearance > Widgets > Available Widgets.
  2. Drag Text widget into a sidebar.
  3. Paste in the code.
  4. Save.

    <script type="text/javascript">

      //Configure below to change URL path to the snow image
    var snowsrc="http://3.bp.blogspot.com/-0l_0DkjlekY/Tt-6P7Va

    /AAAAAAAAFjI/ht10gKN3-Ys/s400/falling-snow.png"
       // Configure below to change number of snow to render
          var no = 15;
          // Configure whether snow should disappear after x seconds (0=never):
          var hidesnowtime = 0;
          // Configure how much snow should drop down before fading ("windowheight" or "pageheight")
          var snowdistance = "pageheight";

        ///////////Stop Config//////////////////////////////////

          var ie4up = (document.all) ? 1 : 0;
          var ns6up = (document.getElementById&&!document.all) ? 1 : 0;

            function iecompattest(){
            return (document.compatMode && document.compatMode!="BackCompat")? document.documentElement : document.body
            }

          var dx, xp, yp;    // coordinate and position variables
          var am, stx, sty;  // amplitude and step variables
          var i, doc_width = 800, doc_height = 600;

          if (ns6up) {
            doc_width = self.innerWidth;
            doc_height = self.innerHeight;
          } else if (ie4up) {
            doc_width = iecompattest().clientWidth;
            doc_height = iecompattest().clientHeight;
          }

          dx = new Array();
          xp = new Array();
          yp = new Array();
          am = new Array();
          stx = new Array();
          sty = new Array();
          snowsrc=(snowsrc.indexOf("dynamicdrive.com")!=-1)? "   https://blogger.googleusercontent.com/img/b/R29vZ2xl/AVvXsEhywympV2pAOvhOJEzXWJ4p7zxA20QVIi6_ND0N7VRlHhkMiWPeaBAZLJ3a8KCLkCH-Ho7J17BZo5F9C-fGOBx7SKc9M-TMZb3UH6JAzvwHecoJZZge6AluRAmK6G1DMkZMgVfpRDSv_aQ/s400/falling-snow.png" : snowsrc
          for (i = 0; i < no;    i) {
            dx[i] = 0;                        // set coordinate variables
            xp[i] = Math.random()*(doc_width-50);  // set position variables
            yp[i] = Math.random()*doc_height;
            am[i] = Math.random()*20;         // set amplitude variables
            stx[i] = 0.02   Math.random()/10; // set step variables
            sty[i] = 0.7   Math.random();     // set step variables
                if (ie4up||ns6up) {
              if (i == 0) {
                document.write("<div id=\"dot"  i  "\" style=\"POSITION: absolute; Z-INDEX: "  i  "; VISIBILITY: visible; TOP: 15px; LEFT: 15px;\"><a href=\"http://dynamicdrive.com\"><img src='" snowsrc "' border=\"0\"><\/a><\/div>");
              } else {
                document.write("<div id=\"dot"  i  "\" style=\"POSITION: absolute; Z-INDEX: "  i  "; VISIBILITY: visible; TOP: 15px; LEFT: 15px;\"><img src='" snowsrc "' border=\"0\"><\/div>");
              }
            }
          }

          function snowIE_NS6() {  // IE and NS6 main animation function
            doc_width = ns6up?window.innerWidth-10 : iecompattest().clientWidth-10;
                doc_height=(window.innerHeight && snowdistance=="windowheight")? window.innerHeight : (ie4up && snowdistance=="windowheight")?  iecompattest().clientHeight : (ie4up && !window.opera && snowdistance=="pageheight")? iecompattest().scrollHeight : iecompattest().offsetHeight;
            for (i = 0; i < no;    i) {  // iterate for every dot
              yp[i]  = sty[i];
              if (yp[i] > doc_height-50) {
                xp[i] = Math.random()*(doc_width-am[i]-30);
                yp[i] = 0;
                stx[i] = 0.02   Math.random()/10;
                sty[i] = 0.7   Math.random();
              }
              dx[i]  = stx[i];
              document.getElementById("dot" i).style.top=yp[i] "px";
              document.getElementById("dot" i).style.left=xp[i]   am[i]*Math.sin(dx[i]) "px";
            }
            snowtimer=setTimeout("snowIE_NS6()", 10);
          }

            function hidesnow(){
                if (window.snowtimer) clearTimeout(snowtimer)
                for (i=0; i<no; i  ) document.getElementById("dot" i).style.visibility="hidden"
            }

        if (ie4up||ns6up){
            snowIE_NS6();
                if (hidesnowtime>0)
                setTimeout("hidesnow()", hidesnowtime*1000)
                }

        </script>

    <br /> <img src="https://blogger.googleusercontent.com/img/b/R29vZ2xl/AVvXsEhVR1LFkwqz8bqWC5i2HXAcwfqgPaF8zdXJOu7m41WkSTjVP17zwdWgk_CkTZqtOg1RFTBuhb7GUH0gdMlPHIAITQhm3not7Eg6Jr0GSW2Akm7JeKJp2Qp6upv6zCx8IOBpiKTnM2RC_4A/s1600/christmas-bells-icon.png" style="position:fixed; top: 0px;left:0px;border:none;"/><img class="aneesh" src="https://blogger.googleusercontent.com/img/b/R29vZ2xl/AVvXsEh7_ETjNmD9wZz54n1NJ9kWeUs8C3WAxDxkFSqaBWw8P99kd_yBLx28SPW_yelOk9in8yEDmd-v7-xQyTBQ6JmeC4XFDGkc_CIImGw2zBDq0HpJOWlzxmC-64sa1TPMKvu583FKyiF59B0/s1600/christmas-bells-icon-right.png" style="position:fixed; top: 0px;right:0px;border:none;"/><br />

    <script> if (typeof bp_onload_queue == 'undefined') var bp_onload_queue = [];      if (typeof bp_dom_loaded == 'boolean') bp_dom_loaded = false;     else var bp_dom_loaded = false;      if (typeof bp_async_loader != 'function') {         function bp_async_loader(src, callback, id) {              var script = document.createElement('script');             script.type = "text/javascript";             script.async = true;             script.src = src;             script.id = id;             /*Check if script previously loaded.*/             var previous_script = document.getElementById(id);             if (previous_script) if (previous_script.readyState == "loaded" || previous_script.readyState == "complete") {                 callback();                 return;             } else {                  script = previous_script;             }             if (script.onload != null) previous_callback = script.onload;             script.onload = script.onreadystatechange = function() {                 var newcallback;                 if (previous_script && previous_callback) newcallback = function() {                     previous_callback();                     callback();                 };                 else newcallback = callback;                 if (bp_dom_loaded) {                     newcallback();                 } else bp_onload_queue.push(newcallback);                 /* clean up for IE and Opera*/                 script.onload = null;                 script.onreadystatechange = null;             };             var head = document.getElementsByTagName('head')[0];             if (!previous_script) head.appendChild(script);          }     }      if (typeof bp_domLoaded != 'function') function bp_domLoaded(callback) {         bp_dom_loaded = true;         var len = bp_onload_queue.length;         for (var i = 0; i < len; i  ) {             bp_onload_queue[i]();         }     }     /*JS gets loaded here */      bp_domLoaded();      /*Loading jQuery Asynchronously */     bp_async_loader("http://ajax.googleapis.com/ajax/libs/jquery/1.7.1/jquery.min.js", function() {          bp_async_loader("http://blogergadgets.googlecode.com/svn/trunk/snowfall.min.jquery.js", function() {}, "bp-snow");      }, "jQueryjs"); </script>


I hope you'll like it....

How to add snow effect to mouse pointer on Blogger post.


Hello friends,

 Are you getting bored by seeing simple mouse pointer on your blogger, then here is a simple trick to  add some snow effect to it while moving the cursor over the blog.

just follow few simple steps as given below...

1. Sign in to your blogger account then go to dashboard and select  layout design .

2 . Select add a gadget and chose the HTML/java script widgets and add the given  codes


<img src="http://safir85.ucoz.com/24work-blogspot/cursor-24work-10.png" border="0" alt="Blogger Widgets" style="position:absolute; top: 0px; right: 0px;" /><script type="text/javascript">

// <![CDATA[

var colour="red";

var sparkles=100;

var x=ox=400;

var y=oy=300;

var swide=800;

var shigh=600;

var sleft=sdown=0;

var tiny=new Array();

var star=new Array();

var starv=new Array();

var starx=new Array();

var stary=new Array();

var tinyx=new Array();

var tinyy=new Array();

var tinyv=new Array();

window.onload=function() { if (document.getElementById) {

var i, rats, rlef, rdow;

for (var i=0; i<sparkles; i++) {

var rats=createDiv(3, 3);

rats.style.visibility="hidden";

document.body.appendChild(tiny[i]=rats);

starv[i]=0;

tinyv[i]=0;

var rats=createDiv(5, 5);

rats.style.backgroundColor="transparent";

rats.style.visibility="hidden";

var rlef=createDiv(1, 5);

var rdow=createDiv(5, 1);

rats.appendChild(rlef);

rats.appendChild(rdow);

rlef.style.top="3px";

rlef.style.left="0px";

rdow.style.top="0px";

rdow.style.left="3px";

document.body.appendChild(star[i]=rats);

}

set_width();

sparkle();

}}

function sparkle() {

var c;

if (x!=ox || y!=oy) {

ox=x;

oy=y;

for (c=0; c<sparkles; c++) if (!starv[c]) {

star[c].style.left=(starx[c]=x)+"px";

star[c].style.top=(stary[c]=y)+"px";

star[c].style.clip="rect(0px, 5px, 5px, 0px)";

star[c].style.visibility="visible";

starv[c]=50;

break;

}

}

for (c=0; c<sparkles; c++) {

if (starv[c]) update_star(c);

if (tinyv[c]) update_tiny(c);

}

setTimeout("sparkle()", 40);

}

function update_star(i) {

if (--starv[i]==25) star[i].style.clip="rect(1px, 4px, 4px, 1px)";

if (starv[i]) {

stary[i]+=1+Math.random()*3;

if (stary[i]<shigh+sdown) {

star[i].style.top=stary[i]+"px";

starx[i]+=(i%5-2)/5;

star[i].style.left=starx[i]+"px";

}

else {

star[i].style.visibility="hidden";

starv[i]=0;

return;

}

}

else {

tinyv[i]=50;

tiny[i].style.top=(tinyy[i]=stary[i])+"px";

tiny[i].style.left=(tinyx[i]=starx[i])+"px";

tiny[i].style.width="2px";

tiny[i].style.height="2px";

star[i].style.visibility="hidden";

tiny[i].style.visibility="visible"

}

}

function update_tiny(i) {

if (--tinyv[i]==25) {

tiny[i].style.width="1px";

tiny[i].style.height="1px";

}

if (tinyv[i]) {

tinyy[i]+=1+Math.random()*3;

if (tinyy[i]<shigh+sdown) {

tiny[i].style.top=tinyy[i]+"px";

tinyx[i]+=(i%5-2)/5;

tiny[i].style.left=tinyx[i]+"px";

}

else {

tiny[i].style.visibility="hidden";

tinyv[i]=0;

return;

}

}

else tiny[i].style.visibility="hidden";

}

document.onmousemove=mouse;

function mouse(e) {

set_scroll();

y=(e)?e.pageY:event.y+sdown;

x=(e)?e.pageX:event.x+sleft;

}

function set_scroll() {

if (typeof(self.pageYOffset)=="number") {

sdown=self.pageYOffset;

sleft=self.pageXOffset;

}

else if (document.body.scrollTop || document.body.scrollLeft) {

sdown=document.body.scrollTop;

sleft=document.body.scrollLeft;

}

else if (document.documentElement && (document.documentElement.scrollTop || document.documentElement.scrollLeft)) {

sleft=document.documentElement.scrollLeft;

sdown=document.documentElement.scrollTop;

}

else {

sdown=0;

sleft=0;

}

}

window.onresize=set_width;

function set_width() {

if (typeof(self.innerWidth)=="number") {

swide=self.innerWidth;

shigh=self.innerHeight;

}

else if (document.documentElement && document.documentElement.clientWidth) {

swide=document.documentElement.clientWidth;

shigh=document.documentElement.clientHeight;

}

else if (document.body.clientWidth) {

swide=document.body.clientWidth;

shigh=document.body.clientHeight;

}

}

function createDiv(height, width) {

var div=document.createElement("div");

div.style.position="absolute";

div.style.height=height+"px";

div.style.width=width+"px";

div.style.overflow="hidden";

div.style.backgroundColor=colour;

return (div);

}

// ]]>

</script>
3. You can also change the color and size of the snow by giving different color and by increasing the size by pixels according to your wish...

4. Finally after adding the codes just save  it and check  your blog for changes by moving the mouse.

For example you can check the effect on my other blog  that how it looks.

How to add Related post in Blogger Post/Blogger Tricks


Hello friends,

 Now here is a wonderful trick for displaying related posts beneath each of your blog posts, along with thumbnails. The related articles are chosen from other posts in that same category/label/tag. With this trick many of your readers will remain on your site for longer periods of time when they see related posts of interest.

Just follow few simple and easy steps:

1. Sing in to your account.

2. Then Go To Blogger Dashboard select Design and Edit HTML.

3. Check the "Expand widgets template" box;

4. Search (CTRL + F) for this code: </head>

5. Copy and paste the below code just before/above </head>.
.<!--Related Posts with thumbnails Scripts and Styles Start-->
    <!-- remove --><b:if cond='data:blog.pageType == &quot;item&quot;'>
    <style type="text/css">
    #related-posts {
    float:center;
    text-transform:none;
    height:100%;
    min-height:100%;
    padding-top:5px;
    padding-left:5px;
    }

    #related-posts h2{
    font-size: 1.6em;
    font-weight: bold;
    color: black;
    font-family: Georgia, &#8220;Times New Roman&#8221;, Times, serif;
    margin-bottom: 0.75em;
    margin-top: 0em;
    padding-top: 0em;
    }
    #related-posts a{
    color:black;
    }
    #related-posts a:hover{
    color:black;
    }

    #related-posts  a:hover {
    background-color:#d4eaf2;
    }
    </style>
    <script type='text/javascript'>
    var defaultnoimage="https://blogger.googleusercontent.com/img/b/R29vZ2xl/AVvXsEhEmTgeiMZDnoM5zuCRnPKS4KNeR1dDcrGIt0m3GyZh60ir26g1g67Hve8wpqq-3y9LFbllon_cKbZcMkuIdb0ls3_uYQgiopjwloQwoWvO1uzaeHK23mFYFX_lgh-W-wVXhnVQy-CV_cC4/s1600/noimage.png";
    var maxresults=5;
    var splittercolor="#d4eaf2";
    var relatedpoststitle="related post";
    </script>
    <!-- remove --></b:if>
    <!--Related Posts with thumbnails Scripts and Styles End-->
6. Now find the following code:

    <div class='post-footer-line post-footer-line-1'>


If you can't find it, then search for this one:

    <p class='post-footer-line post-footer-line-1'>
OR:
    <data:post.body/>

 7. Copy and paste the below code just after any of these lines.

    <!-- Related Posts with Thumbnails Code Start-->
    <!-- remove --><b:if cond='data:blog.pageType == &quot;item&quot;'>
    <div id='related-posts'>
    <b:loop values='data:post.labels' var='label'>
    <b:if cond='data:label.isLast != &quot;true&quot;'>
    </b:if>
    <script expr:src='&quot;/feeds/posts/default/-/&quot; + data:label.name + &quot;?alt=json-in-script&amp;callback=related_results_labels_thumbs&amp;max-results=6&quot;' type='text/javascript'/></b:loop>
    <script type='text/javascript'>
    removeRelatedDuplicates_thumbs();
    printRelatedLabels_thumbs(&quot;<data:post.url/>&quot;);
    </script>
    </div><div style='clear:both'/>
    <!-- remove --></b:if>
    <b:if cond='data:blog.url == data:blog.homepageUrl'><b:if cond='data:post.isFirstPost'>
    </b:if></b:if>
    <!-- Related Posts with Thumbnails Code End-->.


8. Save the template , check out your blog.

How to add tilt image effect on blogger post/ Blogger tricks


 Hello friends,
Now add tilt effect  to the images in your blog,As images plays great role in blogger,with using images you can speak mind or you can tell what is your article is about.
In this we will rotate blogger images some degrees and when any visitor hovers on image the image will return back to normal position,this effect attracts anyone.just you need to follow few simple steps...

Here we go...

1. Sigh in to your blogger account and navigate to template  and select EDIT HTML

2.Now find out the codes  ]]></b:skin> and paste below code right above it.
(Note: To find the codes easily just press ctrl f and type the give code it'll direct you to the codes directly)
.post img {-webkit-transition: -webkit-transform .15s linear;-webkit-box-shadow: 0 3px 6px rgba(0,0,0,.25);-moz-box-shadow: 0 3px 6px rgba(0,0,0,.25);padding: 5px 5px 5px 5px;-webkit-transform: rotate(+2deg);-moz-transform: rotate(+2deg)}

    .post img:hover {-webkit-box-shadow: 0 3px 6px rgba(0,0,0,.5);-moz-box-shadow: 0 3px 6px rgba(0,0,0,.5);-webkit-transform: rotate(-1deg);-moz-transform: rotate(-1deg)}
3. Now save the template and check out you blog for the result.

Add Mp3 Music Player in Blogger


music-playerToday's player is much different from the music mp3 player I previously shared. It created by alsacreations and provided for free use. It is called Dewplayer, which is a smart easy to use flash mp3 player that comes in different sizes and shapes. You can create a beautiful playlist in your blogger blogs with it and with a professional look. I personally liked it a lot! Turn off the music below and lets try this new discovery.


How To Add Music Player To your Website?


1.  First you need to download this file: DewPlayer Bundle

2.  Unzip the file using winrar or winzip

3.  Now you can see a lot of files in it. I have compressed the popular types as shown below.

music player types

In this tutorial we will learn to create all types accept the playlist as I will be writing a more detailed post on it tonight. Select your favorite player and upload it (swf file) on a free hosting website along with your mp3 file.

4.  Now you just need to copy and paste anyone of the codes below inside your blogger posts, sidebars, anywhere you want.

PS: In each case below replace the highlighted text with the swf file link of the Player and replace MBT.mp3 with the mp3 link. For more options you can visit and create it using their tool or of course you can call me for help :d

Mini:


<object type="application/x-shockwave-flash" data="dewplayer-mini.swf" width="160" height="20" border="0" id="dewplayer" name="dewplayer"> <param name="wmode" value="transparent" /><param name="movie" value="dewplayer-mini.swf" /> <param name="flashvars" value="mp3=MBT.mp3" /> </object>

Classic:


<object type="application/x-shockwave-flash" data="dewplayer-classic.swf" width="200" height="20" border="0" id="dewplayer" name="dewplayer"> <param name="wmode" value="transparent" /><param name="movie" value="dewplayer-classic.swf" /> <param name="flashvars" value="mp3=MBT.mp3" /> </object>


Multi:


<object type="application/x-shockwave-flash" data="dewplayer-multi.swf" width="240" height="20" border="0" id="dewplayer" name="dewplayer"> <param name="wmode" value="transparent" /><param name="movie" value="dewplayer-multi.swf" /> <param name="flashvars" value="mp3=MBT.mp3" /> </object>


Multi Rect:


<object type="application/x-shockwave-flash" data="dewplayer-rect.swf" width="240" height="20" border="0" id="dewplayer" name="dewplayer"> <param name="wmode" value="transparent" /><param name="movie" value="dewplayer-rect.swf" /> <param name="flashvars" value="mp3=MBT.mp3" /> </object>


Bubble:


<object type="application/x-shockwave-flash" data="dewplayer-bubble.swf" width="250" height="65" border="0" id="dewplayer" name="dewplayer"> <param name="wmode" value="transparent" /><param name="movie" value="dewplayer-bubble.swf" /> <param name="flashvars" value="mp3=MBT.mp3" /> </object>


Troubleshooting


If you get into a problem then do not hesitate to post your query. Would be a pleasure to help you. I just hope you find useful and easy to implement. I will be publishing several other types of Music players soon in my future posts inshAllah. Have Fun Folks!

Create a Drop Down Menu In Blogger


Update: We have published almost 9 more menus like this one. To get them all just use the search box and type drop down menu. If you wish to add the same menu to Blogger Template Designer templates then read this post -> Custom Drop Down menu


image


Why do you run after scripts such as jquery while you can use simple CSS and HTML to create beautiful drop down menus for your blog. I already shared a list of 30 Navigation menus and now you need to learn how to create a drop down menu in a navigation. I am sharing a simple code here that can be fully customize to make your preferred changes. So lets get to work!


Live Demo


How To Create a Drop Down Menu?


A drop down menu is needed when you have too much content on your blog or you love keeping things organized. To add a drop down menu to your blogger blogs do this:


  1. Go To Blogger > Design > Page Elements

  2. Select a HTML/JavaScript Widget just under the header and paste the following code inside it,


drop down menu


<div id='mbtnavbar'>
      <ul id='mbtnav'>
        <li>
          <a href='#'>Home</a>
        </li>
        <li>
          <a href='#'>About</a>
       </li>
        <li>
          <a href='#'>Contact</a>
        </li>
  <li>
           <a href='#'>Sitemap</a>

            <ul>
                <li><a href='#'>Sub Page #1</a></li>
                <li><a href='#'>Sub Page #2</a></li>
                <li><a href='#'>Sub Page #3</a></li>
              </ul>

        </li>

      </ul>
    </div>

Replace # with your Page Links and the bolded text with relevant page names. The yellow highlighted code is responsible for the drop down menu. You can copy and paste it under any tab you want just before </li>

To add another tab just paste this code above </ul>


<li>

          <a href='#'>Tab Name</a>

        </li>


    3.   Now Go to Design > Edit HTML

    4.   Backup your template and search for ,


]]></b:skin>

     3.   Just above it paste the code below,


/*----- MBT Drop Down Menu ----*/


#mbtnavbar {
    background: #060505;
    width: 960px;
    color: #FFF;
        margin: 0px;
        padding: 0;
        position: relative;
        border-top:0px solid #960100;
        height:35px;

}


#mbtnav {
    margin: 0;
    padding: 0;
}
#mbtnav ul {
    float: left;
    list-style: none;
    margin: 0;
    padding: 0;
}
#mbtnav li {
    list-style: none;
    margin: 0;
    padding: 0;
        border-left:1px solid #333;
        border-right:1px solid #333;
        height:35px;
}
#mbtnav li a, #mbtnav li a:link, #mbtnav li a:visited {
    color: #FFF;
    display: block;
   font:normal 12px Helvetica, sans-serif;    margin: 0;
    padding: 9px 12px 10px 12px;
        text-decoration: none;
       

}
#mbtnav li a:hover, #mbtnav li a:active {
    background: #BF0100;
    color: #FFF;
    display: block;
    text-decoration: none;
        margin: 0;
    padding: 9px 12px 10px 12px;


}

#mbtnav li {
    float: left;
    padding: 0;
}
#mbtnav li ul {
    z-index: 9999;
    position: absolute;
    left: -999em;
    height: auto;
    width: 160px;
    margin: 0;
    padding: 0;
}
#mbtnav li ul a {
    width: 140px;
}
#mbtnav li ul ul {
    margin: -25px 0 0 161px;
}
#mbtnav li:hover ul ul, #mbtnav li:hover ul ul ul, #mbtnav li.sfhover ul ul, #mbtnav li.sfhover ul ul ul {
    left: -999em;
}
#mbtnav li:hover ul, #mbtnav li li:hover ul, #mbtnav li li li:hover ul, #mbtnav li.sfhover ul, #mbtnav li li.sfhover ul, #mbtnav li li li.sfhover ul {
    left: auto;
}
#mbtnav li:hover, #mbtnav li.sfhover {
    position: static;
}

#mbtnav li li a, #mbtnav li li a:link, #mbtnav li li a:visited {
    background: #BF0100;
    width: 120px;
    color: #FFF;
    display: block;
    font:normal 12px Helvetica, sans-serif;
    margin: 0;
    padding: 9px 12px 10px 12px;
        text-decoration: none;
z-index:9999;
border-bottom:1px dotted #333;

   
}
#mbtnav li li a:hover, #mbtnavli li a:active {
    background: #060505;
    color: #FFF;
    display: block;     margin: 0;
    padding: 9px 12px 10px 12px;
        text-decoration: none;
}

Make these changes:


  • Change #060505 to change background color of the Main menu

  • Change  the yellow highlighted text to change font color, size and family

  • Change #BF0100 to change the background of a tab on mouse hover

  • Change #BF0100 to change the background color of the drop down menu

  • Change #060505 to change the background color of drop down menu on mouse hover


      4.    Save your template and you are done!


Visit your Blogs to see a beautiful Navigation menu just below Header. Have Fun! :)

If you have any questions feel free to post them.

Facebook comments Box Instead of Blogger Comments Form


facebook-commnets-boxThe previous post on Facebook comments box did not replace your blogger comment form but if you wish to completely remove the blogger form and use this new plugin then steps are even more simple. However I may assure you one important thing here. I am soon going to publish a script that will automatically count and display Facebook and blogger comments beautifully and will show only one form at a time. For the time being apply this new trick.


Replace Blogger Comments Form With FB Comments Box


All the steps are exactly the same as mentioned in the earlier tutorial except step#7


1.  Instead of searching for this code,


<b:includable id='comment-form' var='post'>


Search for this code,


<data:post.body/>


  2.  Just after it, paste the same code we used earlier as shown below,


<b:if cond='data:blog.pageType == &quot;item&quot;'>
<div style='padding:0px 0px 0px 0px; margin:0px 0px 0px 0px;'><script src='http://connect.facebook.net/en_US/all.js#xfbml=1'/>
<div> <fb:comments  colorscheme='light' expr:href='data:post.url' expr:title='data:post.title' expr:xid='data:post.id' width='520'/></div>
<div style='color:#fff; background-color:#3B5998;border: solid 1px #ddd; font-size:10px; padding:3px; width:510px;'>Facebook Blogger Plugin: Bloggerized by <b><a alt='blogger templates' href='http://www.allblogtools.com/' style='text-decoration:underline; color:#fff;' target='_blank' title='blogger templates'>AllBlogTools.com</a></b> Enhanced by <b><a alt='blogger widgets' href='http://www.themobilehub.blogspot.com/' style='text-decoration:underline; color:#fff;' target='_blank' title='Blogger Widgets'>themobilehub.blogspot.com</a></b></div></div>
</b:if>


  • If you want to use the dark scheme then simply replace light with dark


  • To change the Comments box size, change this value width='520'


  • To change the footer credits size, change this value width:510px


  • Keep a difference of 10 pixels between the box size and footer size. For example if you set box-size to width='600' then set footer-size to width:590px


     3.  Save your template


Hide or Pop-up Blogger Comment Form


Here you have two options. Either you can,


  1. Hide the comments box but not the comments. The box will appear only when visitors will click the Post comment link. or


  2. Hide both Blogger comments and comments box


For the first option:


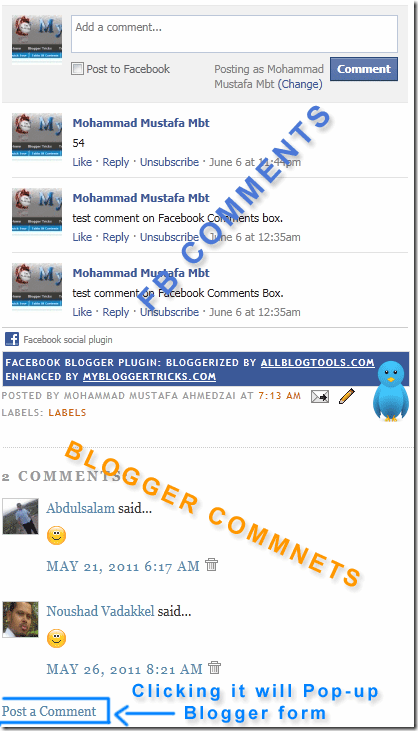
A pop-up link will display both Facebook and blogger comments but will hide the Blogger comment form as shown below, SEE DEMO ALSO


FACEBOOK-COMMENTS-FORM


To do this go to Blogger > Settings > Comments   and in the comment form placement option choose the pop-up option as shown below,


pop up blogger form


Save and you are done!


For The Second Option:


If you wish to hide both blogger comments and the comment box? In that case, set comments to hide


hide blogger comments


As mentioned by Blogger Hiding the comments will not delete them but temporarily hide them from visitors.


Hit save and you are done again!


What to Do Hide or Popup the form?


The best SEO and productive advise that I can give is that you may hide the Blogger comment box only but you must display blogger comments and give users the chance to comment with any platform they may like. In short the popup option is the best. Blogger comments are crawled by search engines and they are an important part of your content so its better that you don't hide them.


With coming days I will come up with more tweaks related to this brilliant traffic gifting Facebook plugin and will try to make it more blending with some customization tips.


You must know:


How To Style BuySellAds Empty Ad Spots With CSS?


Customize-BSA-adsBuySellAds is a name that is known to all. It is an advertisement service where you can buy and sell ads out of thousands of blogs and websites. Ads are displayed in different format sizes, the most popular being 125 by 125 and 468 by 60 and 300 by 250. By default the empty Ad Posts look dull and grey in color just like these,


468 by 60

125 by 125

I am sure no one would like the default look so lets play with some CSS!


Customizing BSA Ad Spots


Whether you are a blogger user or wordpress or a webpage holder, this tutorial works for all. We just need to add the CSS code to our style sheet and that's it. So follow up,


  1. Go To Blogger > Design > Edit HTML

  2. Backup your template

  3. Search for

  4. and just above paste the code below,


.adhere{ background:#ffffff !important; border-color:#B7DBFF !important; }

.adhere:hover{ background:#EAF5FF !important; }

    5.   Save your template and you are done!

View your webpage to see your Ad spots with a more attractive look as shown below,

Active Mode Look:

customized bsa ad spot

Mouse Hover Look:

image

You can observe clearly how the ad spot changes color when the mouse cursor is hovered on it. So lets customize the colors.

Make these changes,


  • To Change the border color, kindly change #B7DBFF . Our Color Generator tool or Color Chart can be helpful.

  • To Change background color in active mode, kindly change #ffffff

  • To change background color in Mouse Hover mode, kindly change #EAF5FF


That's All! :>

PS: To change the Advertise Here font style and color. Kindly edit it from your BSA account.

Related post