Showing posts with label PC tips. Show all posts

Diffrence Between Core i3, Core i5, Core i7 Processors


Intel has stopped selling Core 2 Duo. Core is the new range of Intel processors Named Core i3, Core i5, Core i7 Processors. So we should know the diffrence Between them : -

 Core i3:
* Entry level processor.
* 2-4 Cores
* 4 Threads
* Hyper-Threading (efficient use of processor resources)
* 3-4 MB Cache
* 32 nm Silicon (less heat and energy)


Core i5:
* Mid range processor.
* 2-4 Cores
* 4 Threads
* Turbo Mode (turn off core if not used)
* Hyper-Threading (efficient use of processor resources)
* 3-8 MB Cache
* 32-45 nm Silicon (less heat and energy)


Core i7:
* High end processor.
* 4 Cores
* 8 Threads
* Turbo Mode (turn off core if not used)
* Hyper-Threading (efficient use of processor resources)
* 4-8 MB Cache
* 32-45 nm Silicon (less heat and energy)
hope you find the info good...!!

How To Recover Deleted files from Your PC or Mobiles


Many times this happen with us that accidently any file is deletes and we dont have any choice to recover it..
This really frustrate us and leave in crirical condition.But now we provide very useful information by which you can recover your all deleted data or files.Yes.. Its true and many peoples taking benefit of this function.
Main thing to remember whenever you delete any file after that don't load any file in that drive or chip before recovering.


How To Recover Deleted Files:-
"Recuva" is a software by which we can recover all deleted files very easily.
Accidentally deleted an important file? Lost something important when your computer crashed? 
No problem! 
Recuva recovers files deleted from your Windows computer, Recycle Bin, digital camera card, or MP3 player.


By using this software we can recover,
-Pictures 
-Music 
-Documents 
-Video 
-Compressed 
-Emails
Most important thing of this software is "Its Free"
We just have to download this software and install, after that rest all work done automatically..

Click Here To Download Recuva

Download Youtube Videos without the use of any Third Party Software


1. Go to YouTube, Open the video that you want to download

2. Now you have to make a small change in video link [Replace "www." to "ss"]

For example : If your link is ( http://www.youtube.com/watch?v=4eYJuT0yGrI ) Change it to the (http://ssyoutube.com/watch?v=4eYJuT0yGrI )

3. After it will redirect to a new site [ http://en.savefrom.net/ ]

4. Now you have to choose the format of the video like mp4, 3gp, flv

5. After Choosing your Format, File will be Directly Downloaded
 
You can also download it through mobile (For example : If your link is ( http://m.youtube.com/watch?v=4eYJuT0yGrI ) Change it to the (http://m.ssyoutube.com/watch?v=4eYJuT0yGrI )

How to Fix USB Device Not Recognized in Windows


Are you getting a “USB device not recognized” error whenever you plug in a USB mouse, keyboard, or other USB device? I love USB and have 5 ports on my computer so that I can connect my mouse, keyboard, camera, phone, and printer to it all at once!
However, last weekend, my computer stopped recognizing my USB devices! The strange thing about it was that the USB ports were not bad because all of my devices were still getting power to them. I could still charge my cell phone without a problem!


So I started with the normal fixing methods, including uninstalling the drivers for my devices and reinstalling them. That didn’t work! Next I tried System Restore thinking that maybe I had installed something and it caused a conflict with the USB system drivers. That didn’t work!

I read online that in order to fix this problem I should go to Device Manager and uninstall all of the devices under USB Controllers. Restarted the computer, reinstalled the USB drivers, but the problem STILL did not go away!

You may also see in Device Manager that the device shows up as an “Unknown Device”.

So how did I finally fix the problem? Well, apparently it’s a super simple solution! No need to edit the registry, uninstall drivers, or anything of that sort.

Simply UNPLUG YOUR COMPUTER FROM THE POWER SUPPLY. Yes that’s it! Note that this does not mean just turning off your computer because modern computers don’t really turn off when you press the power button as the motherboard still gets power.

First to explain, the motherboard is where all of hardware of the computer is connected to, including the USB ports. Sometimes the motherboard needs to be “rebooted” also because something can go wrong, i.e. all your USB ports suddenly stop working. The small microprocessor on the motherboard will reload the drivers and your USB ports should be back to recognizing all devices!

So first turn off your computer using Shut Down or pressing the power button and then UNPLUG it from the wall outlet. Let it sit for about a minute and then plug it back in.

Hope this helps someone fix that pesky “USB device not recognized” Windows error!

Adobe Flash Player Full Standalone Offline Installer


Mostly users don’t install this like other software and when it is notified by the browser that required Flash Player plugin is missing, then they click on given link to install this plugin. Its all OK. But it takes more time and users don’t like waiting. So an offline plugin can solve this problem. So here is Offline Standalone Installer.Here Is The Download Links -

DOWNLOAD ADOBE FLASH PLAYER FULL STANDALONE OFFLINE INSTALLER
(For Internet Explorer)
DOWNLOAD ADOBE FLASH PLAYER FULL STANDALONE OFFLINE INSTALLER
(For Firefox, Chrome And Other Browsers)
The good thing about these links is that you can always Download the latest version of Adobe Flash Player Full Standalone Offline Installer. Enjoy.......

How to Remove Your Middle and Last Name from Facebook


Facebook is the most used Social network ever. Almost everybody has a Facebook account. In fact one can get loads of information about somebody from their Facebook account. When it comes to privacy, Facebook might not be the best platform. As it is said that there are all kinds of workaround for everything, therefore there is a workaround for removing the middle name and last name from your Facebook profile as well.
In order to create a Facebook account the user has to pass through various security checks, this is because Facebook does not want any scam or fake profile. To ensure this, one of the measures which Facebook takes into consideration is that it does not allows anybody to miss out the last name. Hence one cannot create his/her profile only by first name and middle name, it is mandatory to fill out your last name as well.
BSee the steps below if you want to hide your last name from your Facebook profile, and believe me it’s quite simple.

Remove Your Last Name from Facebook :

 1. If you have Mozilla Firefox installed then run it, else download it.

2. Now go to http://www.hidemyass.com/proxy-list/
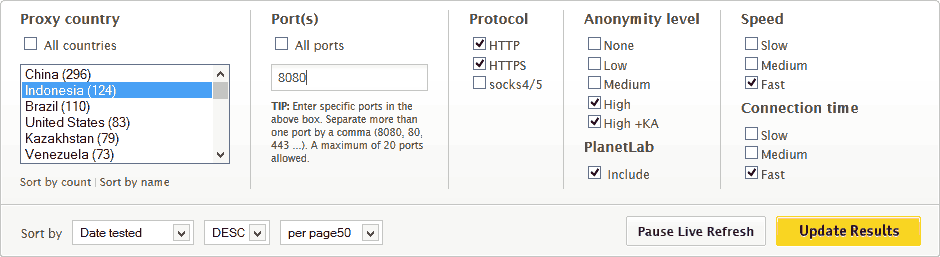
3. Search for a proxy in “Indonesia” with Port no. “8080″ and all other settings as sown in figure below. (Click to see an enlarged image).
get Indonesian proxy1

4. Now make note of the first IP address.
hide last name Facebook proxy list1

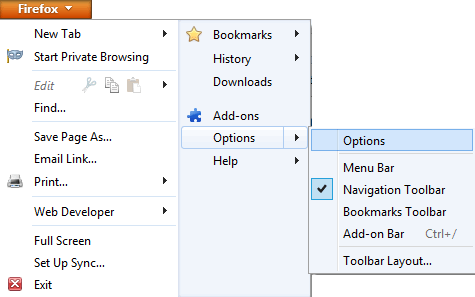
5. Now go to  Firefox > Options > Options.
mozilla firefox options1
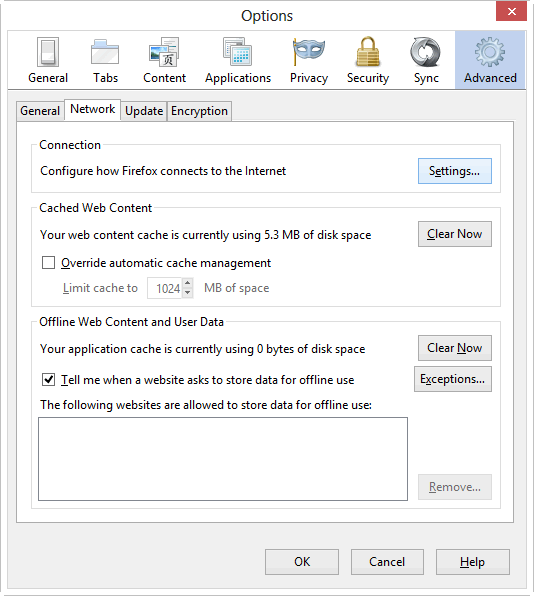
6. Now select  Advanced > Network > Settings…
firefox advanced network settings1
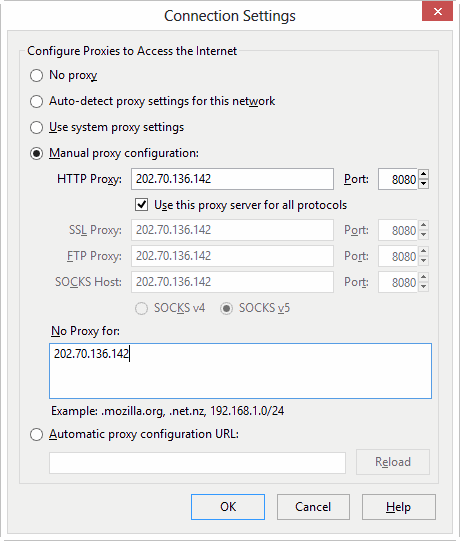
7. Select Manual proxy configuration and enter the proxy you noted in step(4) in HTTP Proxy field and 8080 in Port. Also mark “Use this proxy server for all protocols”. Type the same IP address in the “No Proxy” box and press ok.
connection settings to remove last name from facebook profile1
8. Now login to your Facebook account, go to account settings and change the language to
Bahasa Indonesia. Now try to remove your last name and see the magic. Facebook allows you to save your name without the last name.
9. Now change the language back to whatever you want.

Download Symbian Emulator for PC and Run Symbian Apps on PC


If you are an app developer who develop apps for the Symbian platform then you can test the progress of your apps using the Symbian Emulator for PC. There are five different emulators available on the official site for different versions of Symbian that are Symbian version 3, Symbian version 5, Nokia N97, Symbian Anna (5.2) and Symbian Belle (5.3).Not only for developers, the Symbian Emulators can be used by any person who needs to run Symbian applications on their PC.

Download Symbian Emulator for PC

  1. Visit the official Nokia Developers website.
  2. Download the Symbian Emulator you want to work with from the dropdown menu in the right sidebar.
  3. Unzip the zipped file you downloaded and run the setup.exe file. Accept everything and install anything that the setup asks for.
  4. After the setup is complete run the Emulator.exe file that can be located at “Start Menu > All Programs > Nokia Developer Tools > Symbian SDK”. The path could differ somewhat for different versions of Symbian Emulator, like for the Belle version the path is “Start Menu > All Programs > Nokia Developer Tools > Symbian Belle SDK > v1.0″.
That’s it. You have successfully installed and emulated Symbian Operating System on your PC.

BlueStacks Lets You Emulate Android On Windows


Want to play Android games but don’t have an Android device. Emulate android on windows. Here’s a solution which lets you play all the android apps in full screen mode without any compatibility or performance issues. The software comes with 10 pre-loaded apps and has an option to add custom apps by downloading them through Bluestacks channel or push your apps from Android phone to your PC via Bluestacks Cloud Connect.


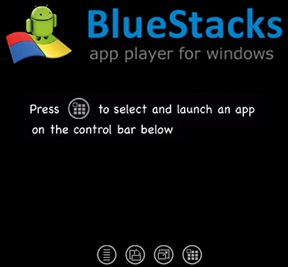
After installing the app, when you launch the app , you get the screen like shown below.

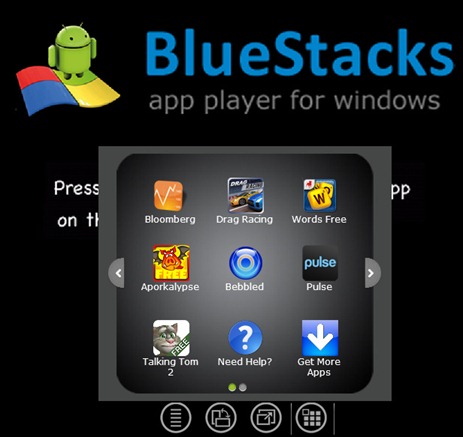
Pressing the shown icon will shown you the games that come pre-installed with the app.


Selecting any game will open the game in full screen. Clicking on the last option that says “Get More Apps” will open up a site to download more games and apps.

Now , this shows all the apps currently available for you to download . On the left side you will find Cloud Connect which allows you to push applications from your phone to Bluestacks. For this you will first need to have BlueStacks Cloud Connect app on your phone which is available through android market .
After installing the app on the phone , click on Cloud connect in the browser and you will get a Phone PIN. Open the app on your phone, enter the PIN and press OK. You will now see a list of apps in BlueStacks Cloud Connect. Check the apps that you want to push to your PC and press Sync.

Cool Facebook Shortcut Keys that you must know


Keyboard Shortcut Keys for the Facebook

1) For the Opening of the Home Page, please enter the  key Alt+1

2) For viewing your Profile Page, Please enter the key Alt+2

3) For the Friend Requests, Please enter the Key Alt+3


4) For viewing the Messages in your Profile, Please enter the Key Alt+4

5) For the Notifications in your Profile, Please enter the Key Alt+5

6) For the Settings in the Profile, Please enter the key Alt+6

7) For the Privacy settings for your Profile, Please enter the Key Alt+7

8) For the About us page in the profile, Please enter the key Alt+8

9) For the Terms and conditions in the Profile, enter the key Alt+9

10) For the Help page, please enter the key Alt+0

11) For the Search box in your Profile press Alt+?

12) For Creating a New Message in the Profile, Please enter the Key Alt+M
       Note-This shortcut may not work in the Internet Explorer

NOTE-When using this Shortcut keys in different browsers you should adjust according to it

1) When you are using the Firefox, just use Shift+Alt instead of Alt in the above Shortcut keys'

2) When you are using the Internet explorer, hit Enter after the triggering of Shortcut key

3) When you are using the Mac, Please use Ctrl+Opt instead of the Alt in the above shortcut keys

How to make an bootable Pendrive Without any Software


Process of bootable Pendrive

1) First insert the Pendrive you wish to boot in the computer, Then go to the "Run"( Press Windows+R) and Hit key "cmd" in the Run dialog box

2) The Pendrive must be Empty, Now Type "DISKPART" on the Command Prompt


3) We get an Separate Window, now write the "LIST DISK", Now please press the Enter

4) Now we get the all Storage Devices available in the computer
     Note-Please use an Pendrive having an capacity of 4GB or more than that

5) Then you want to select the Disk by watching the Size of the File, if your Pendrive do not have an name,For e.g It will list as Disk 0, Disk 1
Now Select the Disk and write your Command e.g SELECT DISK 1

6) Now do this things with concentration, Type this following commands one by one
CLEAN
CREATE PARTITION MEMORY
SELECT PARTITION 1
ACTIVE
FORMAT FS=NTFS

7) Please do not change the order of commands, type as it is after the 6th step Type ASSIGN in the Command Prompt

8) Finally Press EXIT in the Command Prompt

9) After this procedure, insert your Windows 7 OS DVD into the DVD Writer

10) Now Copy the all Contents in the DVD

11) Please Paste those All Copied files into the Pendrive

12) Now the Pendrive is ready for Boot,Please check that all the Contents in the DVD are properly Copied in the Pendrive or Not.

How to Disable USB ports On Computer


Process to Disable the USB ports in the Computer

1) First visit the My Computer in the Desktop, Just Right Click it we get the Several options

2) On that Click "Manage". you get an other dialog box

3) There Click the "Device Manager" in that Box


4) Now go to the Universal Serial Bus Controllers (USB)

5) Then Click the USB Root hub

6) Please Select Disable from the hub

7) Now no more Pen drives and Modem will not work

8) Similarly By using the Above steps Whenever you want you can Enable the USB ports

How to Hide Files Behind an Image


Let us see the Method of how to hide the File behind an image
1) You are using the Cmd, yeah i.e Command Prompt, So do not do mistake in it, it may affects system
2) Select the Suitable image to hide your files
3) Now Zip the files which you are going to hide and Save in .RAR Format, with the Help of Your Favorite Archiver
4) If you have good grip in command line , you can browse the files easily wherever in the System, But when you don't it is Difficult.So Please Keep this Both files ( Image, and .RAR file) in the Desktop
5) Go to Start  > Accessories > Command Prompt where the Command Prompt Window will Come
6) Now type the Following Command
cd desktop
  • Here the cd Stands for the Change in the Directory to Desktop 
7) After this Command enter this below command
Copy /b imagename.jpg + filename.rar finalimage.jpg
  • Here the Imagename.jpg is the name of the image file which you are using for hiding your files in the system, please add the format of that file whether it is .jpg or .png or .jpeg
  • Here the Filename is the name of the file which you are hiding
  • Finally the Finalimage.jpg was your Final image where the files are going to hidden, keep the name whatever you like for this Finalimage, Do not forget to add the Image format

8) if you open this new created file, it just opens as an image, so the work is finished here.But when you want to locate the files, i am going to tell that too
How to View the Hidden Files in the Image
1) We are Using the Winrar to open that Files
2) Drag the image to the Winrar or simply Open it with Winrar
3) Finally Extract the files and you are done
Thanks for reading my article i hope you liked it

How to Remove password from PDF files


1) PDFUNLOCK is the best online tool that will remove the password and give you access to the files in easy steps. Just go to the website and upload your file and unlock it, finally download the output file.
Go to official website of PDFUNLOCK here

2) VeryPDF is also an good online tool that will make your file to break the encryption and make sure you will get the access of editing, copying, pasting options. Follow the similar steps as i said in PDFUNLOCK and download the output file
Go to Official website of VeryPDF here

How to Remove PDF Password by Softwares
1) I am giving an excellent software that will helps you, unluckily it is only for Trial Version, if you like the work of the software you can purchase it........
Download the software here

Disclaimer- The given tips is for educational purpose, do not use it for any illegal purposes

How to Play Android Games on Computer/PC


Let us know how to play android games on your Computer

1) BlueStacks

The best user friendly software that runs your android games on your computer is BlueStacks, which is yet Beta version.

Download the Bluestacks officially from here


Features

  • You can download any game in your market by single click
  • View all the apps and games in full HD Screen
  • Option for installing external .apk android files directly and testing in bluestacks
  • Very user friendly for the beginners in android testing 
2) Android SDK
The SDK refer to the Software Development kit which says it is an tool for the Android Developers, Users also use this for Testing their apps and games, but set up is not easy, and there are lot of to do for running this app on this kit
Download this Android SDK software here
3) Android live
The android live is similar to the first one mentioned above, it is for X86 Windows based systems.
For downloading Android live click here

Speed up your Hard disk


I only recommend doing this if you have 256mb of RAM or higher.

STEP 1: Start > Run > then type SYSEDIT.EXE

STEP 2: Expand the system.ini file window.


STEP 3: Scroll down almost to the end of the file till you find a line called [386enh]

STEP 4: Press Enter to make one blank line, and in that line type

Irq14=4096

NOTE: The above info for the new line is case sensitive


STEP 6: Select File > Save

STEP 7: Close SYSEDIT and reboot your computer

NOTE: Once your computer has been rebooted, you should notice a change in your hdd's performance. I have tested this on IDE hdd's and it has worked fine. I've read in a few locations online that it could possibly work for SCSI disks but I don't have any to attempt the theory. If someone does test it and can vouch for the SCSI's improved performance, please let me know.

Make your computer 3 times faster


This tutorial will teach you how to increase your operating system speed 3 times faster.

this steps should be applied by either slow and fast computers. it will speed up your operating system surfing.

there are 28 easy steps. it might take a bit long to apply them all especially if you're not familiar with windows registry, but trust me it worth it.


1. Visual effects should be set to a minimum.
Start > Settings > Control Panel > System > Advanced > Performance Settings > Visual Effects Tab > Adjust for best performance


2. Switch Off Desktop Background Image
Right Click Desktop > Properties > Desktop Tab > Background None

3. Disable Screen Saver
Right Click Desktop > Properties > Screen Saver > None


5. Disable Fast User Switching
Start > Settings > Control Panel > User Accounts > Change the way users log on or off > Untick Use Fast User Switching

6. Switch Off Power Schemes
Start > Settings > Control Panel > Power Options > Always On > Turn off monitor and turn off hard discs to Never

7. Switch Off Hibernation
Start > Settings > Control Panel > Power Options > Hibernate > Untick Hibernation

8. Activate DMA on Hard Discs/CD ROMS
Start > Settings > Control Panel > System > Hardware > Device Manager > IDE ATA/ATAPI Controllers > Right Click Primary IDE channel and Secondary IDE channel > Properties > Advanced Settings Tab > Tra

9. Disable System Sounds
Start > Settings > Control Panel > Sounds and Audio Devices > Sounds Tab > Sound Scheme to None.

10. Do Not Map Through Soundcard
Start > Settings > Control Panel > Sounds and Audio Devices > Hardware Tab > (highlight your soundcard from the list) > Properties > Audio Devices > (highlight your soundcard from the list) > Properti

11. Disable System Restore
Start > Settings > Control Panel> System > System Restore Tab. Tick the "Turn off System Restore on all Drives"

12. Disable Automatic Updates
Start > Settings > Control Panel> System > Automatic Updates > Turn off automatic updating. I want to update my computer manually

13. Startup and Recovery Options
Start > Settings > Control Panel> System > Advanced > Startup and Recovery Settings > Untick Automatically Restart

14. Disable Error Reporting
Start > Settings > Control Panel> System > Advanced > Error Reporting > Disable Error Reporting

15. Disable Remote Assistance
Start > Settings > Control Panel> System > Remote > Untick Allow remote assistance invitations to be sent from this computer

16. Fix Swap File (Virtual Memory)
Start > Settings > Control Panel > System > Advanced > Performance Settings > Advanced > Virtual Memory Change > Custom Size. Set initial and maximum size to the same value

17. Speed Up Menus
Start > Run > Regedit > HKEY_CURRENT_USER > Control Panel > Desktop Folder. Set MenuShowDelay to 1

18. Disable Offline Files
Start > Settings > Control Panel > Folder Options > Offline Files Untick "Enable Offline Files"

19. Disable Remote Desktop
Start > Settings > Control Panel > System > Remote > Untick "Allow users to connect remotely to this computer"

20. Disable Internet Synchronise Time
Start > Settings > Control Panel > Date and Time > Internet Time > Untick "Automatically synchronize with internet time server"

21. Disable Hide Inactive Icons
Start > Settings > Taskbar and Start Menu > Taskbar TAB > Uncheck "Hide Inactive Icons"

22. Disable Automatic Desktop Cleanup Wizard
Start > Settings > Control Panel > Display > Desktop > Customise Desktop > Untick "Run Desktop Cleanup Wizard every 60 days"

23. Disable NTFS Last Access Time Logging (NTFS File Systems Only)
Start > Run > regedit > HKEY_LOCAL_MACHINE > System > CurrentControlSet > Control > Filesystem. Add a new DWORD value - "NtfsDisableLastAccessUpdate" and set value to 1.

24. Disable Notification Area Balloon Tips
Start > Run > regedit > HKEY_CURRENT_USER > Software > Microsoft > Windows > CurrentVersion > Explorer > Advanced. Create a new DWORD value called EnableBalloonTips and set to 0.

25. Disable CDROM Autoplay
Start > Run > regedit > HKEY_LOCAL_MACHINE > System > CurrentControlSet > Services > Cdrom. Set autorun to 0.

26. Disable Disc Indexing Service
Right Click Start > Explorer > Right Click Each Disc > Properties > Untick "Allow Indexing Service to index this disc for fast file searching"

27.Restart ur pc...enjoy!!!

Windows OS and Softwares File extensions Full Forms


Sound :

MPEG-1/2 Audio Layer 3 (.mp3)
Ogg Vorbis (.ogg)
ASF Audio (.asf,.wma)
Wave form audio format (.wav)
RealAudio (.ra,.rm)
Free Lossless Audio codec(.flac)
Advanced Audio coding (.aac)
MPEG-4 advanced audio coding (.m4a,.mp4)
Musepack (.mpc)
TwinVQ(.vqf)
3GP Music (.3gp)
AC3 Audio File (.ac3)
Adaptive Multi-Rate (.amr)
Adaptive Multi-Rate WB (.awb)
Sun Mircrosystem's audio format (.au,.snd)
Audio Interchange File Format (.aiff)
Purevoice File (.qcp)
AMIGA 8bit sound file (.8svx)
PSION sound file (.prc)
IRCAM sound file (.sf)
soundTool (.sndt)
PSION 8bit sound file (.wve)
soundtracker module (.mod)
FastTracker II module (.xm)
ImpulseTracker module (.it)
ScreamTracker module (.s3m)

Ringtone (Monophonic/Polyphonic) :

MIDI-0 (.mid,.midi)
SP-MIDI (.mid,.midi)
Midi Karaoke (.kar)
MMF/SMAF-1 (.mmf,.smaf)
Qualcomm CMX 3.0 (.pmd)
Motorola Ringtone (.mot)
Sagem Ringtone (.sagem)
Sagem Ringtone (.sagem21)
Ericsson emelody (.emy)
iMelody Ringtone Format (.imv)
Ringtones text transfer language (.rttl,.rtx)
Nokia phone Ring Tone (.nokia,.ott)
Nokia Phone Ring Tone (.noktxt)


Image :


Joint photographic experts group (.jfif,.jif,.jpe,.jpeg,.jpg)
Windows bitmap (.bmp)
Graphics interchange format (.gif)
Truevision TGA (.tga)
Portable network graphics (.pgm)
AVS X image (.avs)
Kodak Cineon Image Format (.cin)
ZSoft IBM PC multi-page paintbrush (.dcx)
Windows device independent bitmap (.dib)
SMPTE digital moving picture exchange (.dpx)
Microsoft icon (.ico)
Magick image file format (.miff)
On-the-air-Bitmap (.otb)
Palm pixmap (.palm)
Portable bitmap format black/white (.pbm)
Xv's Visual Schnauzer thumbnail (.p7)
Photo CD (.pcd)
Zsoft IBM PC Paintbrush file (.pcx)
Apple Mcintosh QuickDraw (.pict)
Portable Pixmap format - color (.ppm)
Adobe Photoshop bitmap file (.psd)
Photo CD - sRGB color (.pcds)
Irix RGB image (.sgi)
SUN Raster Image (.ras,.sun)
X Windows system bitmap black/white (.xbm)
X Windows system pixmap (.xpm)
CCIR 601 4:1:1 (.yuv)


Vector Document :

Windows Metafile (.wmf)
Scalable Vector Graphics (.svg)
Magick Vector Graphics (.mvg)
AutoCAD Interchange Format (.dxf)
Enhanced Metafile (.emf)
Encapsulated Postscript (.eps)
Computer Graphics Metafile (.cgm)
OS/w Metafile (.met)
OpenOffice 2.0 Draw Document (.odg)
OpenOffice 2.0 Draw Template (.otg)
OpenOffice 1.0 Draw Document (.sxd)
OpenOffice 1.0 Draw Template (.std)


Document :

Text files (.txt)
Url address (web) (.url)
HyperTextMarkup Language (.htm,.html)
XHTML (.xhtml)
Rich Text Format/MS Word (.rtf)
Portable Document Format (.pdf)
Adobe Postscript (.ps)
Microsoft Word (.doc)
MS Word template (.dot)
OpenOffice 2.0 Text Document (.odt)
OpenOffice 2.0 Text Template (.ott)
OpenOffice 1.0 Text Document (.sxw)
OpenOffice 1.0 Text Template (.stw)
AportisDoc Palm DB (.pdb)
Starwriter vorlage/Template (.vor)
PocketWord (.psw)
Wordperfect 6 (.wpd)
MS Word 2003 XML (.xml)

Data :


Data Interchange Format (.dif)
dBASE (.dbf)
Microsoft Excel (.xls)
MS Excel Vorlage/Template (.xlt)
Pocket Excel (.pxl)
SYLK (.slk)
Lotus 1-2-3 (.123,.wk1)
StarCalc (.sdc)
StarCalc Template (.vor)
OpenOffice 2.0 Spreadsheet (.ods)
OpenOffice 2.0 Calc template (.ots)
OpenOffice 1.0 spreadsheet (.sxc)
OpenOffice 1.0 calc template (.stc)


Mathematics :

MathML (.mml)
StarMath (.smf)
OpenOffice 2.0 Math (.odf)
OpenOffice 1.0 Math (.sxm)

Presentation :


Microsoft Powerpoint (.ppt)
Microsoft Powerpoint Template (.pot)
StarImpress 5.0 (.sdd)
StarImpress 5.0 Template (.vor)
StarImpress 4.0 (.sdd)
StarImpress 4.0 Template (.vor)
OpenOffice 2.0 Impress (.odp)
OpenOffice 2.0 Impress Template (.otp)
OpenOffice 1.0 Impress (.sxi)
OpenOffice 1.0 Impress Template (.sti)


Compressed archives:


Data compression (.zip)
7Z Archive (.7z)
LHA Archive (.lha,.lzh)
Roshal ArchiveArchive (.rar)
Tape ARchive (.tar)
TAR Gzip Compressed archive (.gz)
BZ2 compressed archive (.bza)
Deepfreezer YZ1 archive (.yz1)

Movie:

Windows Media Video (.wmv)
3GP/3G2 Video (.3gp)
Audio Video Interleave (.avi)
Matroska (.mkv)
Apple Quicktime (.mov)
Motion Picture Expert Group (.pg)
Ogg vorbis Compressed video (.ogm)
MPEG-4 (.mp4)
Flash Video (.flv)
DVD Video Object (.vob)
FLIC Animation (.fli)
Digital Video (.dv)
ASF Video (.asf)
Google Video File (.gvi)

Fasten your BroadBand Speed up to 20%


If you are using a BroadBand connection at your home and using Windows Xp/win 7 as your Operating System, and you feel that your BB speed is a bit less, then in that case you have the option to increase your Broadband speed upto 20%.


1. First of all make sure you are logged in as Administrator.
2. Go to Start -> Run -> gpedit.msc, press OK.
3. Then go to Computer Configuration -> Administrative Templates -> Network -> QOS packet Scheduler.
4. On the right it will give you the option of Limit Reservable bandwidth, open and and select Enabled, and change the value to 0.

Tips to recover scratched CD


Don't you feel like crying every time you add another disc to your pile of scratched discs. Trashing that disc which contained your favorite songs, pics, files, games or videos is not easy.

Read-on, if you find yourself wishing for a miracle every time your fav CD is scratched:
 
Rub a small amount of toothpaste on the scratch and polish the CD with a soft cloth and any petroleum-based polishing solution (like clear shoe polish). Squirt a drop of Brasso and wipe it with a clean cloth.

Technology to the rescue
There are many softwares available on the net, which enable the recovery of the CD data. BadCopy Pro is one such software, which can be used to recover destroyed data and files from a range of media.
 

Just a few clicks is all it requires to recover the disc from almost all kind of damage situation; be it corrupted, lost data, unreadable or defective.

DiskDoctors is another popular company, which offers both software and solutions to recover data from a scratched CDs and DVDs.


General Tips:
* Always wipe the CD from the center outward with stratight spoke-like strokes. Wiping CDs in circles will create more scratches.

* Do not scratch the graphics layer as you cannot repair the disc. HINT: Hold the disc up to a light with the graphics layer facing the light source. If you can see light thru the scratches at any point then the disc may be irreparable and or exhibit loading or playing errors.

* Clean your Disc players lens regularly with a suitable product to ensure optimal viewing pleasure.

* Make sure to use a soft, lint-free cloth to clean both sides of the disc. Wipe in a straight line from the centre of the disc to the outer edge.

* If wiping with a cloth does not remove a fingerprint or smudge, use a specialized DVD disc polishing spray to clean the disc.

* Only handle the disc by its outer edge and the empty hole in the middle. This will help prevent fingerprints, smudges or scratches.

Statistics:
*Fingermarks/prints cause 43% of disc problems!
* General wear & tear causes 25% of disc problems!
* Player-related issues cause 15% of disc problems!
* User-related issues cause 12% of disc problems!
* PlayStation 2 machine scratches cause 3% of disc problems!
* Laser rot (a manufacturer error) causes 2% of disc problems!

Best And Importent Keyboard Shortcuts


Getting used to using your keyboard exclusively and leaving your mouse behind will make you much more efficient at performing any task on any Windows system. I use the following keyboard shortcuts every day:
Windows key + R = Run menu


This is usually followed by:
cmd = Command Prompt
iexplore + "web address" = Internet Explorer
compmgmt.msc = Computer Management
dhcpmgmt.msc = DHCP Management
dnsmgmt.msc = DNS Management
services.msc = Services
eventvwr = Event Viewer
dsa.msc = Active Directory Users and Computers
dssite.msc = Active Directory Sites and Services
Windows key + E = Explorer
ALT + Tab = Switch between windows
ALT, Space, X = Maximize window
CTRL + Shift + Esc = Task Manager
Windows key + Break = System properties
Windows key + F = Search
Windows key + D = Hide/Display all windows
CTRL + C = copy
CTRL + X = cut
CTRL + V = paste
Also don't forget about the "Right-click" key next to the right Windows key on your keyboard. Using the arrows and that key can get just about anything done once you've opened up any program.

Keyboard Shortcuts:

[Alt] and [Esc] Switch between running applications
[Alt] and letter Select menu item by underlined letter
[Ctrl] and [Esc] Open Program Menu
[Ctrl] and [F4] Close active document or group windows (does not work with some applications)
[Alt] and [F4] Quit active application or close current window
[Alt] and [-] Open Control menu for active document
Ctrl] Lft., Rt. arrow Move cursor forward or back one word
Ctrl] Up, Down arrow Move cursor forward or back one paragraph
[F1] Open Help for active application
Windows+M Minimize all open windows
Shift+Windows+M Undo minimize all open windows
Windows+F1 Open Windows Help
Windows+Tab Cycle through the Taskbar buttons
Windows+Break Open the System Properties dialog box


Accessibility shortcuts:
Right SHIFT for eight seconds........ Switch FilterKeys on and off.
Left ALT +left SHIFT +PRINT SCREEN....... Switch High Contrast on and off.
Left ALT +left SHIFT +NUM LOCK....... Switch MouseKeys on and off.
SHIFT....... five times Switch StickyKeys on and off.
NUM LOCK...... for five seconds Switch ToggleKeys on and off.

Explorer shortcuts:
END....... Display the bottom of the active window.
HOME....... Display the top of the active window.
NUM LOCK+ASTERISK....... on numeric keypad http://l.yimg.com/us.yimg.com/i/mesg/emoticons7/79.gif Display all subfolders under the selected folder.
NUM LOCK+PLUS SIGN....... on numeric keypad (+) Display the contents of the selected folder.
NUM LOCK+MINUS SIGN....... on numeric keypad (-) Collapse the selected folder.
LEFT ARROW...... Collapse current selection if it's expanded, or select parent folder.
RIGHT ARROW....... Display current selection if it's collapsed, or select first subfolder.


Type the following commands in your Run Box (Windows Key + R) or Start Run:
devmgmt.msc = Device Manager
msinfo32 = System Information
cleanmgr = Disk Cleanup
ntbackup = Backup or Restore Wizard (Windows Backup Utility)
mmc = Microsoft Management Console
excel = Microsoft Excel (If Installed)
msaccess = Microsoft Access (If Installed)
powerpnt = Microsoft PowerPoint (If Installed)
winword = Microsoft Word (If Installed)
frontpg = Microsoft FrontPage (If Installed)
notepad = Notepad
wordpad = WordPad
calc = Calculator
msmsgs = Windows Messenger
mspaint = Microsoft Paint
wmplayer = Windows Media Player
rstrui = System Restore
netscp6 = Netscape 6.x
netscp = Netscape 7.x
netscape = Netscape 4.x
waol = America Online
control = Opens the Control Panel
control printers = Opens the Printers Dialog


Internet browser:

type in u're adress "google", then press [Right CTRL] and [Enter]
add www. and .com to word and go to it


For Windows XP:

Copy. CTRL+C
Cut. CTRL+X
Paste. CTRL+V
Undo. CTRL+Z
Delete. DELETE
Delete selected item permanently without placing the item in the Recycle Bin. SHIFT+DELETE
Copy selected item. CTRL while dragging an item
Create shortcut to selected item. CTRL+SHIFT while dragging an item
Rename selected item. F2
Move the insertion point to the beginning of the next word. CTRL+RIGHT ARROW
Move the insertion point to the beginning of the previous word. CTRL+LEFT ARROW
Move the insertion point to the beginning of the next paragraph. CTRL+DOWN ARROW
Move the insertion point to the beginning of the previous paragraph. CTRL+UP ARROW
Highlight a block of text. CTRL+SHIFT with any of the arrow keys
Select more than one item in a window or on the desktop, or select text within a document. SHIFT with any of the arrow keys
Select all. CTRL+A
Search for a file or folder. F3
View properties for the selected item. ALT+ENTER
Close the active item, or quit the active program. ALT+F4
Opens the shortcut menu for the active window. ALT+SPACEBAR
Close the active document in programs that allow you to have multiple documents open simultaneously. CTRL+F4
Switch between open items. ALT+TAB
Cycle through items in the order they were opened. ALT+ESC
Cycle through screen elements in a window or on the desktop. F6
Display the Address bar list in My Computer or Windows Explorer. F4
Display the shortcut menu for the selected item. SHIFT+F10
Display the System menu for the active window. ALT+SPACEBAR
Display the Start menu. CTRL+ESC
Display the corresponding menu. ALT+Underlined letter in a menu name
Carry out the corresponding command. Underlined letter in a command name on an open menu
Activate the menu bar in the active program. F10
Open the next menu to the right, or open a submenu. RIGHT ARROW
Open the next menu to the left, or close a submenu. LEFT ARROW
Refresh the active window. F5
View the folder one level up in My Computer or Windows Explorer. BACKSPACE
Cancel the current task. ESC
SHIFT when you insert a CD into the CD-ROM drive Prevent the CD from automatically playing.


Use these keyboard shortcuts for dialog boxes:

To Press
Move forward through tabs. CTRL+TAB
Move backward through tabs. CTRL+SHIFT+TAB
Move forward through options. TAB
Move backward through options. SHIFT+TAB
Carry out the corresponding command or select the corresponding option. ALT+Underlined letter
Carry out the command for the active option or button. ENTER
Select or clear the check box if the active option is a check box. SPACEBAR
Select a button if the active option is a group of option buttons. Arrow keys
Display Help. F1
Display the items in the active list. F4
Open a folder one level up if a folder is selected in the Save As or Open dialog box. BACKSPACE

If you have a Microsoft Natural Keyboard, or any other compatible keyboard that includes the Windows logo key and the Application key , you can use these keyboard shortcuts:


Display or hide the Start menu. WIN Key
Display the System Properties dialog box. WIN Key+BREAK
Show the desktop. WIN Key+D
Minimize all windows. WIN Key+M
Restores minimized windows. WIN Key+Shift+M
Open My Computer. WIN Key+E
Search for a file or folder. WIN Key+F
Search for computers. CTRL+WIN Key+F
Display Windows Help. WIN Key+F1
Lock your computer if you are connected to a network domain, or switch users if you are not connected to a network domain. WIN Key+ L
Open the Run dialog box. WIN Key+R
Open Utility Manager. WIN Key+U

Accessibility keyboard shortcuts:

Switch FilterKeys on and off. Right SHIFT for eight seconds
Switch High Contrast on and off. Left ALT+left SHIFT+PRINT SCREEN
Switch MouseKeys on and off. Left ALT +left SHIFT +NUM LOCK
Switch StickyKeys on and off. SHIFT five times
Switch ToggleKeys on and off. NUM LOCK for five seconds
Open Utility Manager. WIN Key+U

Shortcuts you can use with Windows Explorer:


Display the bottom of the active window. END
Display the top of the active window. HOME
Display all subfolders under the selected folder. NUM LOCK+ASTERISK on numeric keypad http://l.yimg.com/us.yimg.com/i/mesg/emoticons7/79.gif
Display the contents of the selected folder. NUM LOCK+PLUS SIGN on numeric keypad (+)
Collapse the selected folder. NUM LOCK+MINUS SIGN on numeric keypad (-)
Collapse current selection if it's expanded, or select parent folder. LEFT ARROW
Display current selection if it's collapsed, or select first subfolder. RIGHT ARROW